
Class 25 (8P Dec 16th, 8Q&8K Dec 17th)
Task 1. Writing C4
In order to write C4 will need to list the changes made to the plan or the design (3-4) and explain them, by indicating what was the purpose of them and what happened to your overall project after you made that change.
Ex. When I was making the model I remembered the design task said it had to be “comfortable and healthy” so I noticed my design did not have many windows, so I added 3 more. The reason for this change is that natural light is very important to keep people healthy and in a good mood. After I added the extra windows the space seemed more livable.
Task 2. Uploading Summative C
C1 (plan) and C4 (changes) are final. Please ask me any questions before you upload.
C2+C3 (model) take pictures of the final model. From very close to whole pictures. Include also all your process drawings to see how you got there.

IMPORTANT: If you are not finished and want to continue working, let me know and you will be able to take it home and reupload C2 and C3, after the break.
Class 24 (8K Dec 11th, 8P & 8Q Dec 14th)
Welcome back. We are on class 5 out of 6. We have 2 classes of 80 minutes to finish your model.Please remember that in class 6 we will also have to finish Criteria C before uploading.
Task 1. Check where you are
Check what is the plan for today and if you need to make any initial adjustments. Make sure to write changes since you will need them for C4. Next class you will upload C complete before the end of the class.
Task 2. Finish cutting the pieces
You should have finished drawing the walls and send them to me for approval, you drew them on the board and you are ready to cut them out.
 Task 3. Print the floor plan from homestyler to scale
In order to do this you need to download a pdf from MB called 24by24. This file shows you what 24 x24 looks like in a A3 file, so when you print remember to select A3. Print in color.
Follow this video for the instructions:
- on how to change the wall thickness to 0.075 m
- on how to do a screen shot and bring it to the pages document for scale.
- print the A3 in color.
- paste it centered in your board.
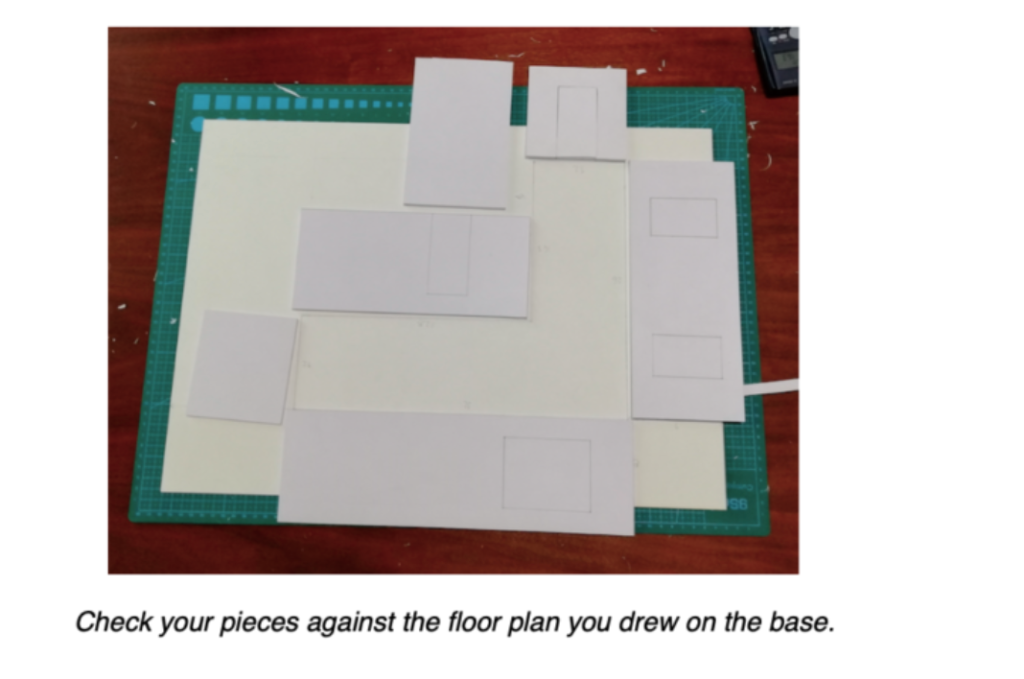
Task 4. Put it together
Some recommendations:
- base needs to remain 30 by 30 don’t cut it
- place your design in the middle of the base
- print the color homestyler as your base
- paste all the walls around your design.
- take pictures to upload to your tasksheet

Bring your phone next class since you will need to take pictures before you upload.
Class 23 (8P Dec 8th, 8Q & 8K Dec 9th)
Welcome back. We are on class 4 out of 6. We have 3 classes of 80 minutes to finish your model.
Task 1. Check where you are
At this point you should have finished your Plan and you have uploaded to MB. Please read the comments I gave you to improve it. Check what is the plan for today and if you need to make any initial adjustments.
Let’s look at the MB calendar.
Task 2. Draw the pieces on the board to size
Last class you finished drawing the pieces on paper and considering the 3mm. You sent it to me and I approved it. Now it is time to draw the pieces on the board.

Task 3. Cut the pieces

Task 4. Check with your plan to see if you are on track
Please check if you are on track with what you planned to do today. Are you behind? How are you going to adapt your plan so you can catch up?
Class 22 (8K Dec 3rd, 8P&8Q Dec 4th)
Welcome back. We are on class 3 out of 6.
Today we are going to start drawing the walls on the board, to prepare to cut them.
Task 1. Check where you are
At this point you should have finished your Plan and you have uploaded to MB. Please read the comments I gave you to improve it. Check what is the plan for today and if you need to make any initial adjustments.
Task 2. Draw all the pieces you need
Now it is time to draw all the pieces that you will need to cut to this 1:25 scale. Take into consideration the extension of the corners to cover the 3mm (task 5)

Draw all the pieces you need to cut. Indicate sizes of walls, doors and windows.
For the walls heights we will take 3.5 meters in real life, you will need to calculate it to scale 1:25 to see how many centimeters in your drawing.
Task 3. Add the 3mm
Remember about the 3mm thickness of the material
Task 4. Draw the pieces on the board to size
Task 5. Cut the pieces
Task 6. Check with your plan to see if you are on track
Please check if you are on track with what you planned to do today. Are you behind? How are you going to adapt your plan so you can catch up?
![]()
Class 21 (8P Nov 30rd, 8Q&8K Dec 1st)
Welcome back, today we are going to continue with making. We are on the 2nd out of 6 classes for criteria C.
Task 1. Check where you are
At this point you should have finished your Plan and you have uploaded to MB. Please read the comments I gave you to improve it. Check what is the plan for today and if you need to make any initial adjustments.
Task 2. Getting the base boards
Mr Young will give you base boards cut 30×30 cm. This is where you will place your model. Today we will start by drawing your 6 meters by 6 meters space in the center of the board and naming the board so you can find it later.
Task 3. Scale
Have a look at the student guide:
![]()
In real life our quarantine room is 6 meters by 6 meters, how are we going to fit it in our 30 cm x 30 cm board? We need to use scale.
If you want an introduction to scale, because you don’t remember well you can check here to review your geometry from grade 7.
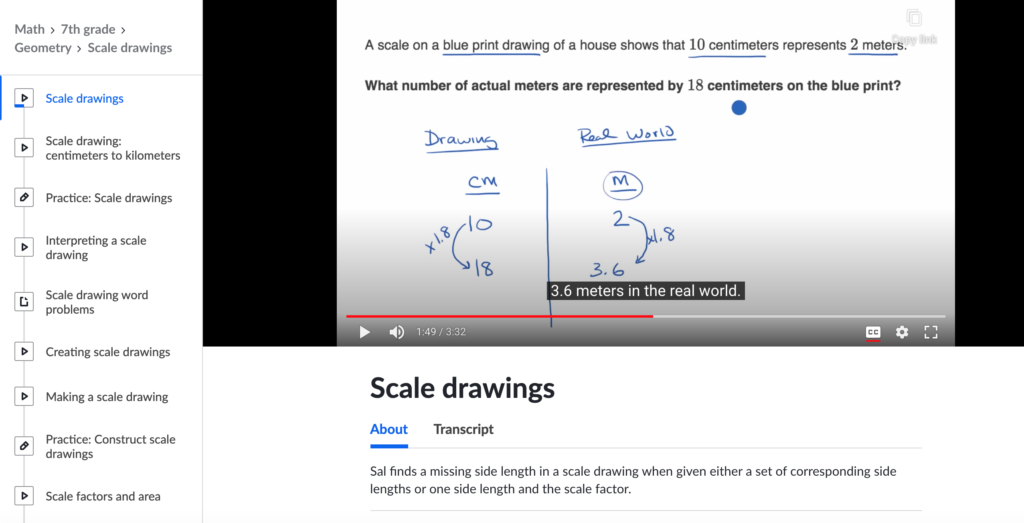
This is an example on how scale works:

For our project, we are going to look at the most common scales:

What do you think what scale we should use? Do we want to make a big or a small model? What is easier to make and work with?
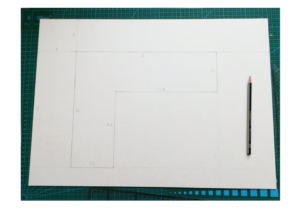
Task 4. Drawing the square on the board
Please draw your base square on the board following the 1:25 scale, so the square should be 24 by 24. Make sure to center it well, so it looks nice since presentation is very important.
Task 5. Thickness extension +0.3 mm
Since the board we will use to make the walls have a particular thickness we need to consider. Our board is 3mm thick.

What does that mean? That we need to extend some walls, to cover the corners.
Do a drawing to decide what parts you want to extend:

Task 6. Draw all the pieces you need
Now it is time to draw all the pieces that you will need to cut to this 1:25 scale. Take into consideration the extension of the corners to cover the 3mm (task 5)
Draw all the pieces you need to cut. Indicate sizes of walls, doors and windows.
For the walls heights we will take 3.5 meters in real life, you will need to calculate it to scale 1:25 to see how many centimeters in your drawing.
Task 6. Print the homestyler model to scale. Paste it on the board.
Task 7. Check with your plan to see if you are on track
Please check if you are on track with what you planned to do today. Are you behind? How are you going to adapt your plan so you can catch up?
![]()
Class 20 (8K Nov 23rd, 8P&8Q Nov 24th)
We are going to start working on Criteria C today, to make your models.
https://www.canva.com/design/DAEOSiSA_gE/view
Task 1
These are the basic steps we will be covering:

The first thing we need to do is distribute the steps into the classes we are going to have available to complete criteria C:

Try to think how long each task will be, and distribute them in the different classes we have. At the end of the class you will be asked to upload the plan so I can check.